This usually comes with shiny new pens, fresh notebooks and renewed hope and optimism. But I recently heard someone say:
“I can’t believe it’s already the end of January . . . so much has happened. I feel tired.”
Can you relate?
A lot has been happening in the world. It’s easy to feel overwhelmed by the news, let alone the tsunami of information we’re bombarded with online.
If you’re feeling overwhelmed and tired (like many people are), let’s try to make life a little easier for ourselves. In this article, I share a strategy you can use to make difficult things feel easier to do. I also share how you can apply the strategy to studying challenging subjects.
I remember having a brief conversation with a year 11 student at the start of the pandemic. It went something like this . . .
Me: How are you feeling given the situation (i.e., COVID-19)?
Year 11 Student: Some of us are stressed but not because of COVID. It’s because of what our teachers have just said to us.
Me: What have your teachers been saying to you?
Year 11 Student: They keep saying this year is going to be really hard. The subjects are going to be much, much harder.
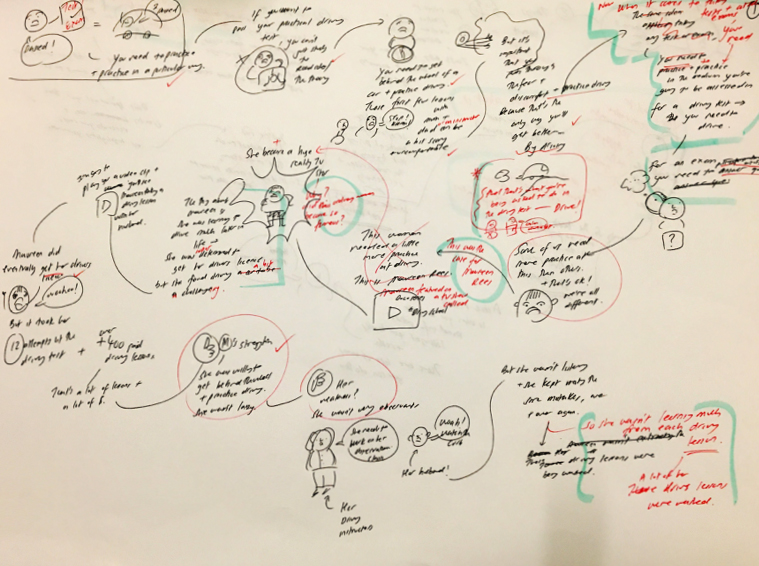
Driving home from the talk, I couldn’t stop thinking about what this student had said as well as the worried look in her eyes.
Here’s what happened . . .
I was booked to deliver a presentation to 150 year 10 students. My talk was scheduled for the last period of the school day.
In case you’re not aware, the last period of the school day is not an ideal time slot for a guest speaker. It’s usually a tough gig, as students are tired and they just want to go home.

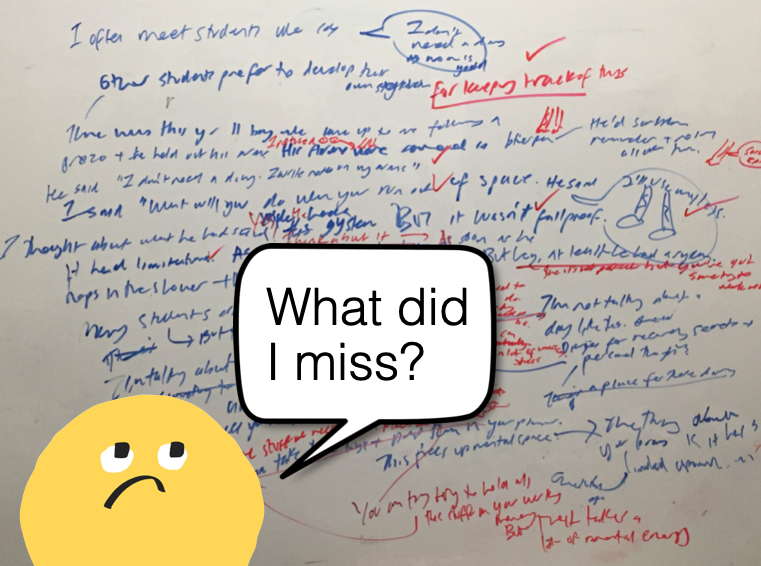
When I arrived at the venue to set up my gear, I spotted two teachers. I approached them and introduced myself to them as the guest presenter. One of them said in an alarmed, panicky tone:
“Oh! You’re the guest speaker? I need to warn you that these students are a horrible group. They do not warm to guest speakers!”
She continued. . .
“Does your talk have a structure to it? Do you know what you’re talking about? These year 10s are a really hard group to work with!”
I felt my stress levels begin to rise, and by accident, I knocked my glass of water off the stage, and it broke. Glass shattered everywhere. Instead of helping me pick up the glass, the teacher said:
“Look! It’s a sign of things to come!”
At this point, the young IT guy arrived to help connect my laptop to the AV system. He overheard this teacher talking about what a bunch of ratbags these students were. His expression was a combination of shock and horror. He said to her:
“Why are you saying this to our guest presenter? I don’t think it’s helpful.”
The teacher reacted defensively. She blurted out, “She needs to know! It’s important we tell her!” and then she left in a hurry.
I took some deep breaths and continued setting up my stuff.
The students arrived.
I delivered the talk.
The talk went really well. Phew!
It turns out these students weren’t horrible at all. They were a normal group of students who happened to be a bit tired and over it (it didn’t help that it was a boiling hot day).
That day, I learnt an important lesson: Worrying about how difficult something might be doesn’t help. It just uses up your precious brainpower and energy, which you could have spent doing something else (i.e., something more productive).
Whenever I fixate on how hard something will be, I’m filled with fear. Imposter syndrome and self doubt kick in (“Will I be able to do this? What if I fail and it turns out to be a total flop?”). This usually leads to a bad case of avoidance and procrastination.

In the book Make It Stick, Peter Brown explains:
“A fear of failure can poison learning by creating aversions to the kinds of experimentation and risk taking that characterize striving, or by diminishing performance under pressure, as in a test setting.”
If you feel worried that you’re not going to be able to perform well in a subject, this is going to use up a big part of your working memory capacity. Instead of thinking about the content, you’ll be thinking, “Am I going to be able to do this? What if I can’t? Should I drop the subject?”.
In short, you’ll have dramatically less brainpower available for learning.
There’s a simple question I ask myself when something feels hard. And it’s this . . .
How can I make this behaviour easier to do?
Professor BJ Fogg calls this the Breakthrough Question. According to Fogg, there are three ways you can make any behaviour easier to do:

In his book Tiny Habits, Fogg explains:
“Regardless of what your aspiration is, increasing your skills, getting tools and resources, and making the behaviour tiny are what makes things easier to do. . .
Sometimes all you’ll need is the right tool to make a new habit easier to do, like using skinny floss [for flossing teeth], and other times all you have to do is scale the behaviour back to its tiniest version, such as flossing just one tooth. Think of making something easy to do as a pond with three different ways to enter the water. Whether you jump off the dock, wade in at the beach, or drop in from a rope swing, you’ll soon be swimming in the same water.”
In other words, you have options!
There are many things you can do to make studying those ‘hard’ subjects a little easier.
With that in mind, here is a short list of behaviours and ideas that will help you get a better handle on your challenging subjects:
If you can focus better, you can learn and retain more information. If you constantly check your phone, put it on silent and away from your body before you sit down to study. My phone lives in pocket number 1 of a vertical wall hangar in my dining room (well away from my workspace).
Study strategies such as active recall (e.g., flashcards) and dual coding (e.g., mind mapping) are more effective than rereading and highlighting your notes. Like any new skill, they take a little time to get used to, but they’ll save you a lot of time in the long run.

Some textbooks explain ideas better than others. The textbook on your school booklist is not the only one or necessarily the best one out there. You don’t need to feel wedded to it. Check out other study guides and resources.
A good night’s sleep allows you to focus better in class, retain more information and feel better. Make sleep your top priority. Here are some behaviours I engage in to get more and better sleep:
In the evening, I put my phone away in another room to charge (and I don’t touch it until the next day)
I don’t look at any screens at least one hour before bed
I go to bed at the same time and wake up at the same time everyday
Create a system to organise your notes, past exam papers and handout sheets. Over time, you may need to tweak and refine your system, but that’s okay. I’ve been tweaking and refining my system for years.
For example, I used to store all my mind maps in an A3 flip file (in no particular order). But when things started to get out of control, I switched to cataloguing them alphabetically.
If you’re confused, don’t suffer in silence. Ask your teacher for help. That’s their job. If you feel shy asking a question in front of the class, approach your teacher after class.
Make life easier for your future self by jotting down key ideas in class. If something is confusing, make a note (you can focus on that in a study session at home). Your memory has limits, and if you don’t write it down, chances are you won’t be able to remember it.

If you feel overwhelmed by the idea of doing several hours of study each day, start with just five minutes. Five minutes of study is infinitely better than doing nothing!
Once you’ve developed the habit of sitting down and studying for 5 minutes, you can ramp it up. But start small.
When you manage to sit down and do a little study, congratulate yourself. Say to yourself, “Good job!” This positive reinforcement makes us feel good, which helps us establish a study habit.
When your teachers say, “This subject is going to be really hard”, I think they’re trying to communicate to you, “You need to sit down and study. You can no longer wing it.” They may be afraid that you’re not taking things seriously.
Instead of worrying, be in action. Pick up some flashcards and start testing yourself. Tidy your desk. File away your notes from today. You’ll feel better and do better if you focus on doing the things that make studying that subject a little bit easier.

We are sold this idea that, if you want to go places in life, goal-setting is absolutely essential.
For many years, I enthusiastically attended workshops with other goal-setting enthusiasts, where I wrote long (and overwhelming) lists of goals.
But towards the end of last year, instead of feeling delight at the idea of setting goals, I felt dread.
When I thought about setting goals, there was a little voice in my head that screamed, “Please don’t make me do this!”
So I stopped, and I listened to that little voice.
I’ve learnt that just as you shouldn’t force yourself to wear tight shoes, it’s not always helpful to force yourself to do certain things.
Sometimes you need to try a different approach, which is exactly what I’m doing this year.
I’ve decided to shift my focus from setting goals to running tiny experiments.
It’s a subtle mental shift that takes me from feeling fixed and rigid to curious and playful.
If you’ve ever created a list of goals or New Year’s resolutions, only to abandon them shortly after (and felt demoralised), tiny experiments may be for you.
In this blog, I’ll share what tiny experiments are and how you can use them to have more fun and experience more growth and learning.
In her excellent book Tiny Experiments: How to Live Freely in a Goal-Obsessed World, neuroscientist Dr Anne-Laure Le Cunff argues that traditional goal-setting approaches no longer work in these uncertain times. She states:
“The linear way is wildly out of sync with the lives we live today. The challenges we’re facing and the dreams we’re pursuing are increasingly hard to define, measure, and pin to a set schedule. In fact, a common challenge for many people these days is feeling stuck when it comes to their next steps: instead of providing a motivating force, the idea of setting a well-defined goal is paralysing. When the future is uncertain, the neat parameters of rigid goal-setting frameworks are of little help; it feels like throwing darts without a target to aim at.”
Dr Le Cunff argues that the way we set goals is broken. Not only does traditional goal-setting encourage toxic productivity, but it can also leave us feeling dissatisfied, as if we are constantly failing. She states:
“…they [traditional goal-setting methods] create a discouraging perspective where we are far from success. Our satisfaction – the best version of ourselves – lies somewhere in the future.”
She argues a new approach is required that takes us away from “rigid linearity to fluid experimentation”.

A tiny experiment is a fun, low-stakes way to test out a new behaviour and see if it’s for you.
This may not sound revolutionary, but the power of tiny experiments lies in the mental shift they bring.
Instead of pursuing fixed and rigid goals, when you run a tiny experiment, you open yourself up to exploring new possibilities and stepping into the unknown.
In the book Tiny Experiments, Dr Le Cunff lays out a simple process for designing your own tiny experiments.
The process begins by playing a game of ‘self-anthropology’. In other words, you observe your own life and capture those observations by making field notes.
Here are some things to capture in your field notes:
For instance, yesterday I went to stock up on supplies from a small bulk foods store. I got talking to the sales assistant, who mentioned that she worked at two bulk food stores in different areas. I asked her if she noticed any major differences in the customers between the two stores. Her answer surprised me. She said:
“The customers up in the hills are less rushed. They are more willing to chat. People here seem in a hurry… a bit more fast paced.”
This five-minute conversation made me realise I don’t want to feel rushed or give the impression I’m in a hurry and have no time for a chat. I want to experience more calm in my life.
That’s the first step when it comes to designing a tiny experiment: gathering a rich source of observations.
The next step is to come up with a research question and a hypothesis (i.e. an idea you want to put to the test).
I know this part may sound serious and scary, but trust me, you don’t need to be a scientist to come up with a research question and a hypothesis to test.
There’s a magical word that can help to kick-start the process: Maybe.

Maybe if I checked my phone only at certain times in the day, I’d feel calmer?
Maybe if I put my phone away 30 minutes before going to bed, I’d sleep better?
Maybe if I exercised for 30 minutes each morning, I’d feel calmer and less stressed?
Maybe if I got up and walked on my treadmill every 30 minutes for 5 minutes, I’d have more energy?
Maybe if I rode my bike and walked more (instead of driving), I’d feel more relaxed and less busy?
These are examples of potential research questions I’ve brainstormed.
The word Maybe is incredibly powerful. When you use the word Maybe in this way, it sparks your curiosity and opens you up to exploring new possibilities.
Once you’ve come up with a question, you then turn it into a hypothesis.
Below is a figure from the book Tiny Experiments that illustrates how to turn an observation into a research question and a hypothesis.

Last year, I ran various tiny experiments, several of which focused on cultivating calm.
I had noticed that my days often felt hamster wheely, rushing from one activity to the next. I wanted to feel calmer and more grounded.
With this in mind, I designed the following tiny experiment:
After I finish delivering a presentation, I will lay flat on the couch for 15 minutes and do nothing. I’ll do this for the next 5 days.

So, for the next five days, I conducted my lying flat tiny experiment.
After lying flat for 15 minutes, I’d check in with myself: How do I feel? Do I feel less stressed? More grounded? I also reflected on how I felt at the end of the day.
By doing these quick check-ins, I was collecting data on my tiny experiment.
After I’d completed this tiny experiment, I took a step back and asked myself, “How did that tiny experiment go? Was it a success? Do I want to continue doing this?”
I concluded that the experiment had been a success. I discovered that forcing myself to do nothing was a good way to regulate my nervous system and feel calmer.
But not all of my tiny experiments have been quite so successful.
Last year, I ran a tiny experiment that completely backfired.
If I had taken a traditional goal-setting approach, I would have said I had failed dismally and hung my head in shame.
But there is no failure when it comes to running tiny experiments, only growth and learning.
This tiny experiment involved selling clothing on Depop (an online fashion marketplace for buying and selling secondhand clothes).
Tiny Experiment:
I will put up one item of clothing on Depop every day for the next 30 days.
My hope was to earn some extra cash, declutter my wardrobe and extend the life of some of the clothes I no longer wear.
But as I ran this tiny experiment, it became clear it wasn’t working: I was buying more clothes than I was selling!

I’m embarrassed to admit this, but it was Winter time, and I became obsessed with cashmere jumpers (I loved the warmth and soft feel against my skin).
After listing an item for sale, I found myself scrolling through Depop, searching for more cashmere jumpers to buy. I would enter a trance-like state, as if I was using a poker machine.
If I had been selling more items, maybe I could have justified this behaviour, but I was selling very few items. Once postage and fees were factored in, I was earning only $1–$2 per item!
It wasn’t until I bought and put on a jumper that had clearly shrunk in the wash, revealing my belly button in all its glory, that I quickly came to my senses and said, “Enough!”
It was time to get off the consumer treadmill!

I quickly aborted this tiny experiment and deleted my Depop account.
You could say this tiny experiment was a flop. But I didn’t beat myself up about it. As I mentioned earlier, there is no failure when it comes to tiny experiments (only growth and learning), and I had learnt something valuable from this experience.
What did I learn?
I learnt that selling clothes online was a trap for me. It exposed me to all these other beautiful items that were really hard to resist.
I also discovered that taking photos of my clothing items made me appreciate each piece a little more. In the end, I decided to hold on to and wear several items I had taken for granted.
I also learnt that it was okay for me to quit the experiment and try something else. There was no shame in quitting. In fact, quitting was the right thing for me to do.
You always have options when it comes to your tiny experiments. You get to be flexible because nothing is set in stone.
When you are new to tiny experiments, it can feel daunting to design your own experiments from scratch.
I find it helpful to see examples of other people’s tiny experiments. This is why I belong to Dr Le Cunff’s Ness Labs community: a community of people excited about growth, learning, and running tiny experiments.
In this online community, people share their tiny experiments with each other.
Here is a small selection of tiny experiments people have shared with me:
As you can see, these are all small behaviours performed over short time periods. Most of them can be slotted into even the busiest of schedules. This is the power of tiny experiments.
After you’ve conducted your tiny experiment for the specified duration, you have three choices:

For example, in my experiment of doing nothing, I scaled the 15 minutes on the couch back to just 10 to see if I could still get the same benefits. To my delight, 10 minutes seemed to work just as well as 15 minutes.
When you run a tiny experiment, you’re constantly tweaking and refining what you do, which means you’re continuously learning and growing as a person. This helps build momentum and a feeling of success.
At the end of the day, tiny experiments are a fun, low-stakes way to improve your life. With your sights no longer fixated on some far-off destination, you have the freedom to experiment and see what works best for you.

And look, I get it. I can understand why new year’s resolutions have become so unpopular.
It’s frustrating to vow to make a change only to find that you’ve fallen off the bandwagon a few days later.
I’ve been there. I know how dispiriting it can be.
But what if I told you there was a process you could follow that could help you change your behaviour in any area that is important to you?
There is a process. It’s called Behavior Design.
The process takes me about 20-30 minutes (from start to finish).
It’s not a quick fix, but it works.
In my experience, Behavior Design is way more effective than the stock standard strategies you hear about, such as manifesting, vision boards, SMART goals, accountability buddies, etc.
There’s nothing inherently wrong with doing those things. But used on their own, these strategies often set us up to fail.
Behavior Design is different.
This system allows you to “become your own soul’s doctor” (a phrase used by Stoic philosopher Epictetus). Basically, you quit chasing gurus and the latest trends. By following the process, you take control of your life and move yourself in the direction of a flourishing life.
I learnt about Behavior Design from Stanford University Professor BJ Fogg.
Last year, I participated in his online program, Design for Behavior Change, and I’ve been using his system ever since.
Behavior Design is a systematic process that helps you to change your behaviour and design for behaviour change. What I love about Behavior Design is it doesn’t take a one-size-fits-all approach to behaviour change. By using this process, you can pinpoint the behaviours that are the right fit for you.
The foundation of Behavior Design is the Fogg Behavior Model (B = MAP).

This model explains all human behaviour. According to the Fogg Behavior Model, if you want a behaviour to happen, you need three things to occur all at the same time:
If any one of these components is missing, the behaviour won’t happen.
The Behavior Design process takes all of these components into account.
If you just switched off when you saw that long list of steps or read the word ‘Magic wand’, I don’t blame you. It’s a lot. But please, stay with me.
Behavior Design is straightforward (no magic is involved here). Unlike new year’s resolutions, which we tend to set, forget, and abandon, Behavior Design delivers results.
I’m going to walk you through each of these steps for an aspiration of mine that I set for the new year: To build strength (muscle).
Let’s go!
The first step is to get clear on your aspiration (i.e., the goal or outcome).
What do you want to achieve?
Don’t worry about making it a SMART goal. Your aspiration can be vague and abstract.
Here’s one of my aspirations for the new year:
To build strength (muscle).
When I think about building strength, the outcome I want to achieve is training consistently (three weight lifting sessions per week).
I’m not setting a goal to “get a six-pack.” Ugh. Extrinsic goals like this never leave me feeling fulfilled or motivated for long. In contrast, the idea of being someone who trains consistently and is strong and healthy does excite me.
After clarifying your aspiration, you need to think about the concrete behaviours that will help you achieve it.
This is the crucial step we often miss. Too many people stop at setting vague goals when it comes to changing their behaviour, which is their ultimate downfall.
As BJ Fogg says, when we try to motivate ourselves towards an abstraction, this rarely works.
So, here I am, saying I want to build strength to become a ferociously sturdy lady. This is a great idea, but how will I do it?
According to Behavior Design, I need to focus on the concrete behaviours (i.e., the things I can do right now or at a specific point in time) that will help build muscle.
In this step, you imagine you have magical powers and you can get yourself to engage in any behaviour.
The playful Professor Fogg even recommends purchasing a magic wand, waving it, and asking yourself:
“If I could wave a magic wand and get myself to do any behaviour to achieve this aspiration, what would it be?”

After waving my homemade magic wand in the air (made out of a thin stick and electrical tape), I asked myself:
“If I could get myself to engage in any behaviour to build strength, what would it be?”
I wrote down each behaviour on an index card.
Here are some of the behaviours I brainstormed:
BJ Fogg writes in his book Tiny Habits:
“You are not making any decisions or commitments in this step. You are exploring your options. The more behaviors you list, the better. You can tap into your creativity or maybe ask friends for their ideas.”
If you’re struggling to come up with behaviours, you can also use generative AI to help you brainstorm. But there is power in generating your own ideas away from a screen (my advice is to try to do this on your own or with a friend before turning to AI).
Take each of the behaviours you’ve brainstormed and make them crispy. By crispy, BJ Fogg means specific.
For example, ‘Punch boxing bag 10 times (jab, cross)’ is a crispy behaviour compared to ‘Do boxing workout’.
This is where the ‘magic’ happens. In this step, you determine the best behaviours to engage in. BJ Fogg calls these your ‘Golden Behaviours’.
You’ll need a large, clear surface to do this and some index cards (four in total). Each of your crispy behaviours will also need to be written out on index cards.
Fogg breaks this stage down into two rounds.
Here’s what you do in Round 1 . . .
Write down ‘High Impact Behaviour’ and ‘Low Impact Behaviour’ on two index cards. Place the ‘High Impact Behaviour’ card at the top and the ‘Low Impact Behaviour’ at the bottom.
Pick up one of your crispy behaviours (written on a card) and ask:
“How effective is this behaviour in helping me to achieve my aspiration?”
Place it along the vertical continuum. If a behaviour is highly effective in moving you towards achieving your aspiration (e.g., it will have a high impact in helping me to build strength), place it closer to the top. If a behaviour isn’t very effective in moving you towards your goal, put it closer to the bottom.

For example, watching a documentary on women weightlifting may be inspiring and enjoyable, but it won’t help me build strength. For this reason, I placed this card at the bottom of the continuum. But doing five squats regularly would be highly effective at helping me achieve greater leg strength, so I placed this card at the top.
Do this with all your crispy behaviours. The table will get messy, but that’s okay. Trust the process and keep putting your cards down.
That’s Round 1 complete. Now, for Round 2 . . .
Round 2 involves getting grounded in reality. You may have several high impact behaviours, but you may find you’re not motivated or able to do them. What you do next will weed out those behaviours.
Create two more cards: “Yes, I can get myself to do this!” and “No, I can’t get myself to do this.” Place them like so (see image below).

Now, we take each card and ask:
“Can I actually get myself to do this behaviour?”
Move the cards along the horizontal plane.
When I asked myself, “Can I get myself to buy $1000 worth of gym equipment?” my response was “Not a chance!”. Firstly, I don’t have the space for more gym equipment, and secondly, I can’t justify spending more money on gym equipment! I moved this card over to the far left.

Again, don’t overthink it. Move the cards quickly. Go with your gut.
Once you’ve moved all the cards, focus on the second top quadrant. What behaviours do you have in this location?
These are what BJ Fogg calls your ‘Golden Behaviours’.

These behaviours have three things in common:
You want to channel your time, energy, and attention into engaging in these behaviours.
For example, once I had shuffled my cards around in the two rounds, my golden behaviours were:
BJ Fogg recommends selecting three to four Golden Behaviours to focus on. I can see why.
You have a limited amount of time, energy, and attention. Focusing on too many different behaviours for a specific area can be overwhelming. You run the risk of giving up before you even get started.
When I looked at my Golden Behaviours, I realised several behaviours could be combined into a basic workout routine, leaving me with the following four Golden Behaviours:
This step of focus mapping was pleasantly surprising. It gave me insights and clarity about why I had felt stuck with my strength training for so long. Here’s what I realised:
After I had pinpointed my golden behaviours, I immediately texted a friend who is a physiotherapist. I asked if he would help me develop a simple strength training routine. He said yes and started sending links to explore ideas. I was off and running (no pun intended).
Once you’ve completed step 4, you can stop and call it a day. However, there are three other major steps in Behaviour Design that are worth mentioning. If you’re keen to learn more about this fantastic process, keep reading.
When a behaviour is easy to do, it feels fun. You can do it quickly. This means you’re more likely to do it and do it again and again.
Instead of saying to myself, “Lift weights for 1 hour a day” and having no idea what exercises I’d be doing, I say, “Pick up dumbbells and do five overhead presses” or “Look at strength training routine and start with exercise 1”. It may not seem like much, but it’s a start. It’s also infinitely better than letting my dumbbells sit and collect dust.
If you want to learn more about making behaviours easier, I highly recommend checking out BJ Fogg’s book Tiny Habits (one of my favourite books).

A prompt is a trigger. It reminds you to engage in the desired behaviour. It says to your brain, “Pick up your dumbbells now!”.
The excellent news for me (and all of us) is we don’t have to hire a life coach or personal trainer to be prompted to take action. According to BJ Fogg, the best prompts are things you already do on a regular basis (i.e., pre-existing habits).
Think of behaviours like having breakfast, brushing your teeth, or having a shower. These are all excellent prompts that you can piggyback a new behaviour onto.
For instance, I have a pre-established habit of running on my treadmill every morning. Since I’m already in gym clothes, this is an ideal prompt for a quick strength training session. Here’s what I came up with:
After I finish running on my treadmill (prompt),
I will pick up my dumbbells and do five presses (new behaviour).

I can do more than five dumbbell presses, but I tell myself five is the minimum required to keep the habit alive.
Once you’ve found a place for your new desired behaviours in your daily routine, it’s time to get to work and test things out.
After engaging in a new behaviour, it’s super important to give yourself lots of positive reinforcement. Fogg calls this ‘celebration’. You can say to yourself, “Great work!” or clap your hands. You need to release positive emotions.
This may sound a bit cheesy and over-the-top, but do not skip this critical step. These positive emotions help to wire in the new behaviours as habits.
If a new behaviour isn’t working for you, that’s okay. Play around with it. Ask yourself the following questions:
For instance, after my morning run, I did a 15-minute strength session on the Peloton app using some resistance bands. Some exercises weren’t my cup of tea, so I tweaked the workout.
When it comes to behaviour change, don’t take yourself too seriously. You’ll do better and have more fun by approaching change with a playful mindset.
Behavior Design allows you to be your own self-help guru. Rather than following generic advice, you get to develop your own tailored solutions, which is incredibly powerful.
The other powerful thing about Behavior Design is that you don’t have to psych yourself up to engage in your ‘Golden Behaviours’. You’ve selected behaviours you want to do, so very little motivation is required.
I understand that this may seem complicated, but trust me, this process is extremely practical.
Do yourself a favour: sit down and try following the steps involved in Behavior Design. The more you do it, the easier it becomes. And unlike new year’s resolutions, this process delivers lasting change.
Research shows active recall (aka retrieval practice) is a highly effective strategy for remembering information. This strategy will take your studies and your grades to the next level.
Active recall involves bringing information to mind without looking at your books and notes.
I have spent the last 30 days experimenting with this excellent learning strategy. In this blog, I’ll share what I did and how I kept the process interesting for my brain.
I no longer need to study for tests and exams.
So, why did I spend 30 days using active recall strategies?
In my line of work, I need to constantly come up with new and original content to present to students. I also need to memorise this content. Why?
Because if I was to read from a sheet of notes or text heavy slides that would be really boring for students. I want to connect with students and to do this, I have to be able to deliver the content off the top of my head with speed and ease.
This is where active recall enters the picture.
Active recall helps to speed up the learning process. It allows you to learn more in less time.
Below I share some of the ways I use active recall to learn new presentation content. Keep in mind, you can use all of these strategies to prepare for an upcoming test or exam.
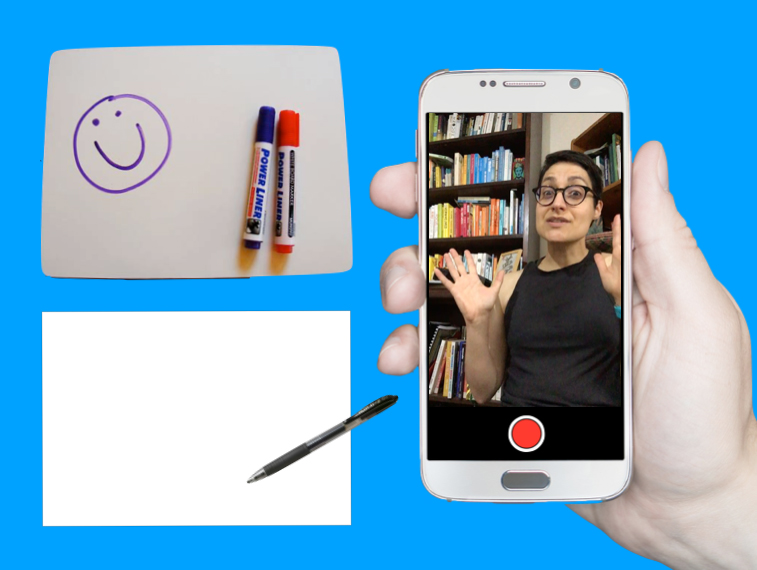
Whiteboards are wonderful learning tools. Here’s how I use a whiteboard to do active recall . . .
I push my speech notes to the side, so I can’t look at them. Then I grab a marker and say to myself, “What can you remember? Go!”.
I write out everything I can remember on the whiteboard. Once I’ve exhausted my memory, I pick up my notes and check to see how I went (using a red marker to make corrections).
No whiteboard? No problem!
I pick up a pen and sheet of paper and start scribbling out whatever I can remember on the topic. When I get stuck, I pause and take a few deep breaths as I try to scan my brain for the information.
I regularly remind myself that it is okay to not remember the content. “This is how the process goes!”, I say to myself. There is no point beating myself up. That only leads to feelings of misery and not wanting to do active recall practice.
After having a shot at it, I take out my notes, pick up a red pen, and begin the process of checking to see how I went.
Sick of writing? I get it.
Try drawing out the information instead. Alternatively, you can use a combination of words and pictures, which is what I often do.
Grab a blank piece of paper (A3 size is best) and create a mind map of everything you can remember on a topic (no peeking at your notes). Then check your notes or the original mind map to see what you remembered correctly and incorrectly.
Writing and drawing out information can take time. If you want to speed up the process, you can talk to yourself.

But don’t do this in your head. It’s too easy to just say “Yeah, yeah, I know this stuff!”. You need to speak it out loud as this forces you to have a complete thought. Then, check your notes to see how you went.
The only downside with this approach is you don’t have a tangible record of what you recalled, which brings me to the next strategy . . .
I make videos of myself presenting the content (without referring to my notes). Although I use special software and tools to make my videos, you don’t need any fancy equipment. Your phone will do the job. Here’s what you can do . . .
Set your phone up so the camera is facing you. Now hit the record button and tell the camera what you’re going to do active recall on. Have a shot at explaining the idea. Then stop recording and hit the play button.

Watching yourself struggle to remember information is often hard viewing. But this is where it’s super important to double down on telling yourself kind thoughts (e.g., “I’m still learning this content. It’s going to be rusty and feel clunky – that’s okay!”).
You need to take a deep breath and keep watching because the video will give you valuable feedback.
For example, if you stop midsentence and you don’t know how to proceed, that tells you something: you don’t know this stuff so well! Make a note. This part of the content needs your attention.
Hand your notes over to a friend, parent, or sibling. Now get them to ask you questions on the content.
I sat with my mum and showed her a print out of my slides for a new presentation. The slides were just pictures (no text).
As I went through the slides, I explained the ideas to mum. I made notes of any sections I was rusty on. Mum also asked lots of questions, which allowed me to think more deeply about the content.
When it came crunch time (a few days before the final presentation), I printed out my presentation slides (16 per page) and used each slide as a prompt. I’d look at the slide and say, “What do I need to say here?”.

Sometimes I wrote out what I’d be saying in relation to each slide (without looking at my notes). Then I checked my original notes to make sure I hadn’t forgotten anything.
It’s really important that you don’t skip the stage of checking to see how you went, especially as you become more confident with the content.
At times, I found myself thinking “I know this stuff! I don’t need to check my notes” but then another part would say, “You better just check . . . just to be on the safe side”.
I’m glad I forced myself to check because more often than not I would discover that I had missed a crucial point.
Zines are cute little booklets you can create on any topic you like. They are fun to make, so I thought I’d try making a mini zine on the main points of some new content I had to learn.
I folded up an A4 page into a booklet and then I sketched out the main points on each panel.
I create a deck of flashcards on some key ideas (question on one side and the answer on the back) and then I test myself with them.
I read the question and before flipping the card, I write out the answer on a sheet of paper or say it out loud. Then I check to see how I went.
The beauty of flashcards is they are small and portable (they can easily fit in your pocket or bag). Whenever you have a spare minute or two, you can get a little active recall practice in.
It’s not enough to do active recall just once on the content you need to learn. For best results, you want to practice recalling the information several times over a period of time.
I didn’t follow a strict schedule for the 30 days. I had my notes for each important chunk of information I had to learn pinned to eight different clipboards.
Every morning, I’d pick up a different clipboard and I’d practice that specific content. I knew as long as I’d had a good night’s sleep in between practice sessions that the information was being strengthened in my brain.
Doing active recall is a bit like doing a high intensity workout: it can be exhausting. But you must remember, just like a high intensity exercise session is an effective way to train and get fit, active recall is an effective way to learn. Unlike less effective strategies (e.g., rereading and highlighting), you can learn a lot in a short space of time with active recall.
The key is to expect the process to be a little uncomfortable. Don’t fight the discomfort. If you trust the process and persevere, it won’t be long before you begin to see amazing results.
Just because active recall is challenging to do that doesn’t mean you can’t have fun with it.
Using a combination of different active recall strategies is one way to keep things fresh and interesting for your brain. But you may wish to try the following things to add a little boost of fun to your active recall sessions:
• Use a different type of pen
• Use a different coloured pen
• Change the type of paper or notebook you use (e.g., instead of using lined paper, use blank A3 paper)
• Incorporate movement into your active recall sessions (e.g., walk and test yourself with some flashcards)
• Change your study environment (e.g., go to the library or study outside)

Like I said, active recall is challenging to do, especially when you first start learning new content. You can feel awkward and clumsy. For this reason, it’s easy to make excuses to get out of doing it (e.g., “I’m too tired”, “I’m not ready to do it”, and “It’s not the right time”).
This is where you need to harness the power of habits.
Find a set time in your day to do a little active recall practice. For instance, during my 30 days of active recall, I scheduled my practice sessions for first thing in the morning. I knew after I washed my face, I would sit down to practice.
Incorporating active recall into my morning routine worked really well for me. I was getting the hardest thing done first thing in the day. And once it was done, I could relax. It was done and dusted!
At a certain point, I became more confident with the content and I found I was on a roll. I felt motivated to do active recall.
This is when I started to look for spare moments in the day to squeeze in a few extra mini practice sessions.
For example, one day I found myself waiting in a car. I grabbed a paper shopping bag and started scribbling out the content onto the bag. As soon as I got home, I checked the shopping bag against my notes.
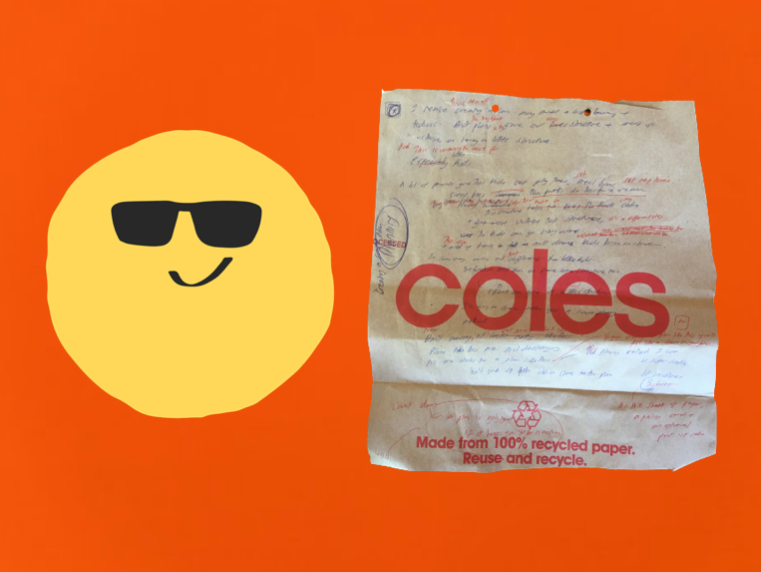
I hope you can see that there’s no one set way to do active recall. This is a highly effective strategy you can be creative with. As long as you’re testing yourself and checking to see how you went, you can’t go wrong.
And if you do make a mistake? It’s no big deal. If you check to see how you went, you won’t embed the error in your long-term memory.