
A good night’s sleep improves every area of your life. This includes your emotional wellbeing, memory, metabolism, ability to focus, stress response, and much more.
One theory is Revenge Bed Time Procrastination.
Although this concept originated in China, Revenge Bed Time Procrastination is a global phenomenon.
The idea of Revenge Bed Time Procrastination is simple . . .
When you feel like you don’t have much control over your day (due to work, study, and/or sports commitments), you sacrifice sleep to engage in fun activities to regain some sense of freedom.
Instead of sleeping, you stay up late watching your favourite shows, playing video games, and/or chatting with friends online.
But this comes at a cost. By seeking revenge on your work/school day and sacrificing sleep, your health suffers.
Your ability to study and learn is also negatively impacted. When you’re sleep deprived, the hippocampus (that’s the part of the brain associated with memory and learning) ceases to function properly. This makes it incredibly difficult to retain information when you study.
High school students need about 9-10 hours each night.
Adults need about 7-9 hours.
But it’s not just quantity of sleep that matters. It’s quality, too.
Getting up throughout the night to check your phone destroys your sleep quality.
The good news is there are a range of simple things you can do to get more and better sleep. Since you spend about a third of your life asleep, it makes sense to learn how you can optimise this area of your life.
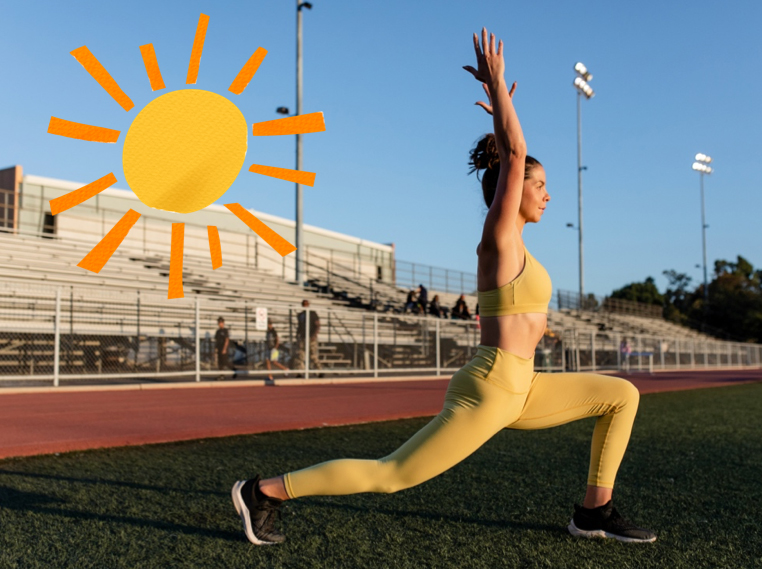
Getting some sunshine first thing in the morning when you wake up can help you sleep better at night. Even just 10 minutes of sunshine can work wonders. You could create a tiny habit of eating breakfast outside or going outside for a short walk, run and/or workout.
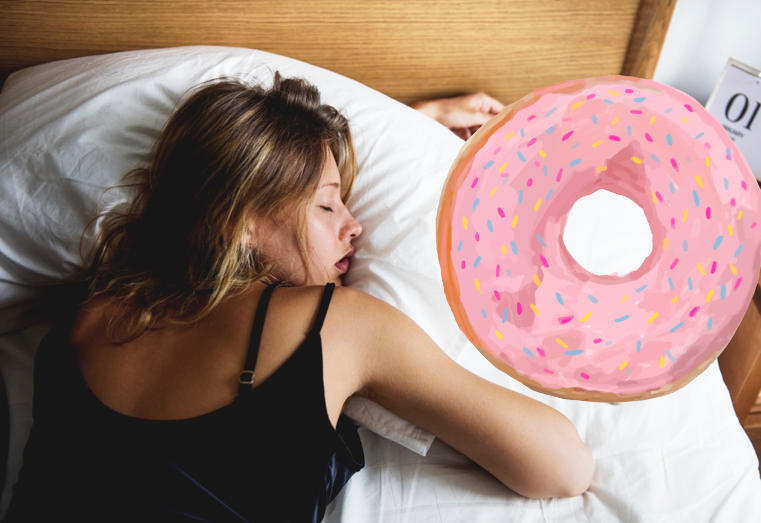
If you use your phone as an alarm, there’s a good chance you’ve developed the habit of sleeping next to your phone. When your phone is in sight and within arms reach, it’s tempting to keep checking your phone.
Co-founder of the Centre for Humane Technology Tristan Harris says sleeping with your phone next to you is like sleeping next to a giant doughnut. It’s really hard to resist.
In addition, the light that is emitted from your phone messes with your ability to produce melatonin (a hormone that makes you feel sleepy).
This explains why so many people struggle to fall asleep. And it’s why many sleep scientists recommend charging your phone in another room at least 30 minutes before you go to bed. Out of sight, out of mind.
It’s not just the light from screens that keeps you awake at night. Scrolling through social media and playing video games are mentally stimulating tasks. These apps and games are designed to hook you in and hijack your attention.
The problem is this is the polar opposite to how you need to feel before you go to bed!
To get a good night’s sleep, you need to slow down and calm your mind, which brings me to the next point . . .

When I was a child, a character called Fat Cat would come on the television at 7.30pm every night. Fat Cat would get into bed, wave, and say “Goodnight boys and girls”.
Fat Cat was a big fat prompt for bedtime. He was effectively saying to parents, “Put your children to bed before the adult programs start”.
As children, most of us had some kind of winding down time before bed. Our parents would give us a bath, put on our pyjamas, and read us a book. These activities helped to calm our minds.
But as we got older, many of us abandoned winding down time.
It’s time to bring back winding down time and create bedtime rituals. Engaging in just 15-30 minutes of calming activities before bed can make a massive difference to your sleep quality.
My bedtime ritual involves the following:
• Charging my phone in another room
• Putting on my cosy pyjamas
• Dimming the lights in my bedroom
• Reading a book (nothing too exciting or work related)
• Writing down my wins for the day

If you find yourself having to fluff your pillow up or flip it like a pancake throughout the night, it could be time for a pillow upgrade.
If you keep putting off shopping for a new pillow, I don’t blame you. Shopping for pillows can be frustrating and disheartening. I have purchased many expensive pillows that I haven’t been able to sleep on (e.g., too high, too low, or too firm). But I recently found the perfect pillow.
So, my advice is don’t give up. Keep searching for the perfect pillow.
Here are my pillow shopping tips:
• Go to a bed store, find a mattress that is similar to your own, and test out a range of different pillows on that mattress.
• Don’t be afraid to take a 15 minute power nap with the pillow in the shop!
• Some sales assistants will try to sell you really expensive pillows ($200AUD+) but the most expensive pillow may not be the best pillow (I ended up buying a $40 pillow).
I had a stack of Guardian Weekly news magazines that I wanted to get through. I thought, “Why not create a tiny habit of reading the news before bed?”
This was a terrible idea.
On the night’s I read the news before bed, I noticed that I would have nightmares.
So my advice to you is this: don’t read the news right before going to bed! Find a better spot in your daily routine to do it (after breakfast or lunch work works for me).

A survey by Sleep Junkie found that people who washed their sheets frequently (every 12.8 day on average) reported sleeping better than people who washed their sheets less frequently.
There’s something really nice about getting into a bed with clean sheets. Why not change your bed sheets and see how you sleep tonight?
If your mind is racing, grab a piece of paper and write out what you’re thinking. It doesn’t have to make sense or even look nice.
There is something mentally liberating about getting your thoughts out of your head and down on paper. When I write my thoughts down, I gain a little distance from them. Those thoughts are also less likely to keep looping through my head on repeat.
When you sleep, you want your room to be dark. The darker the better.
If you can see little green or red lights coming from devices, put tape over them. Block out curtains can work really well, too. But if you’re not in a position to change your curtains, I recommend investing in a good eye mask to block out the light.
I have experimented with lots of sleep masks over the years, but my favourite is a sleep mask I was gifted from Baxter Blue (you can check it out here). This eye mask is a little pricey but it’s super comfortable as it doesn’t apply any pressure on your eyes. Most importantly, it does a great job of blocking out the light.

Studies show eating a fibre rich diet can lead to better sleep.
Where do you get fibre from?
From plant foods (i.e., beans, vegetables, fruits, and wholegrains).
There is no fibre in meat, eggs, dairy, and junk food.
Add an extra serve of vegetables to each of your meals (including breakfast). If you’re not a fan of vegetables, find ways to hide them in your meals. For example, whenever I add a handful of spinach or kale to a smoothie, I can’t even tell it’s in there!
There are many different things you can do to improve your sleep each night. The key is to commit to making sleep a top priority. Commit to trying a few of these strategies.
Getting healthy sleep is one of the simplest ways you can improve the way you feel, think, and learn. Let’s face it, everything feels easier after a good night’s sleep.

It has made me a calmer, better focused, happier, more mentally flexible, and creative person.
It takes anywhere from 20 to 45 minutes to do this practice, but trust me, this morning practice is time well spent.
It usually feels hard at first, but by the end, I feel strong, confident, and clearer in my thinking. As clichéd as it sounds, this practice helps me be the best version of myself.
What simple morning practice am I talking about?
I’m talking about my movement practice.
Before I do any work (e.g., check my email or messages, read the news, or deliver a presentation), I make myself do some physical activity.
I usually run on a treadmill, ride a stationary bike, or lift heavy weights.

I can’t say I’m leaping out of bed with joy at the thought of exercising. There’s always a little voice in my head that grumbles, “Ugh, do we have to do this?”
But I push forward and lace up my running shoes because I know that by the end, I’ll feel amazing.
Twenty minutes into my movement practice, my husband says he can hear me ‘whooping’ with joy from the other end of the house.
The natural ‘runner’s high’ people talk about is real.
I can relate to Cultural Historian Vybarr Cregan-Reid when he describes his running highs in the following way:
“They are as strong as bootleg whisky. They make you want to stop everyone that you pass and tell them how beautiful they are, what a wonderful world this is, isn’t it great to be alive?”
The amazing thing is that a year ago, I couldn’t run for more than a minute without being completely out of breath. Now I can run for 45 minutes nonstop. And I’m hooked.
How did I get here? And more importantly, how can you cultivate a movement practice that leaves you feeling energised, less stressed, and in a great mood?
Do you remember, as a child, running around the playground, swinging on the monkey bars, and playing games like Chasey?
You did these things naturally and effortlessly, and you enjoyed doing them. No one had to force you to move.
You ran for the sake of running. You ran because it made you feel good and fully alive.

This is what movement does for me. It makes me feel excited about life.
I’ve discovered this is the key to building a long-lasting movement practice: you have to find delight in moving your body. And you have to hang in there for long enough for the delight to show up.
You see, the delight probably won’t be there straightaway. Instead, what you’ll usually find is that there’s some discomfort and resistance for the first 10 – 15 minutes of your movement practice.
But if you persist, trust me, the delight will come knocking at your door and sweep through your house like a group of wild party animals.
Just to be clear, you don’t have to run to experience this delightful feeling. Any moderate-intensity physical activity, such as riding a bike, dancing, and swimming, will do the job.
In the book The Joy of Movement, psychologist Dr Kelly McGonigal makes it clear that you can achieve a natural high from any sustained physical activity.
She says the key to experiencing this ‘exercise induced euphoria’ is to put in the time and effort. She writes:
“You just have to do something that is moderately difficult for you and stick with it for at least twenty minutes. That’s because the runner’s high isn’t a running high. It’s a persistence high.”

The thing about movement is that it takes effort. But that effort is what delivers the delight!
When you do hard things for a sustained period of time, your brain rewards you by serving up a cocktail of feel good chemicals, such as dopamine, endorphins, serotonin, noradrenaline, and endocannabinoids.
From an evolutionary perspective, this makes sense.
Life for our ancient ancestors was hard work and often dangerous. To survive, they had to forage and hunt for food, find water, build shelters, and run from wild predators.
These neurochemical rewards (e.g, dopamine and serotonin) would keep them going. And keep going they did!
Hunter-gatherers clocked up thousands of steps each day. They were constantly on the move because their survival depended on it.
But here’s what I find really interesting . . .
Despite being incredibly active, hunter-gatherers’ brains were wired for comfort and laziness. This wiring served them well, especially when food was hard to obtain. Conserving energy through sedentary behaviour was a survival trait.
This explains why most of us feel resistance to the idea of physical exercise.
Fast-forward 30,000 years to today: our modern environment is completely different from that of our ancient ancestors, but our brains are still the same (i.e. wired for comfort).

Want food? You can order it with the tap of a button. In our modern world, you don’t have to move much, if at all.
Because of our ancient wiring, some resistance to physical activity will always be there. We just have to push ourselves to do the hard things first (e.g., exercise), knowing that the rewards will come if we persist for long enough.
As you start moving your body, during those first few minutes, you may find yourself thinking, “Why am I doing this? This doesn’t feel good!”
To which, I say: Can you feel your heart pounding in your chest? Can you hear yourself huffing and puffing? Is that sweat dropping off your face and onto the ground?
Fabulous! You’re on the right track. Hang in there. It won’t be long before your mood starts to shift in a dramatic way.
I have come to love the feeling of my clothes soaked in sweat after I exercise. There was a time when I thought that was gross. But not anymore.
Those sweaty, stinky clothes are evidence that I’ve worked hard. It’s proof that I pushed myself and the feel good chemicals are flowing through my brain and will continue to do so for the next few hours.
In The Official Dopamine Nation Workbook, psychiatrist Dr Anna Lembke explains what happens at a neurochemical level when you do hard things. She writes:
“While engaging in these kinds of painful activities [exercise, meditation, ice-cold water plunges, etc], our dopamine levels rise slowly over the latter half of the activity and remain elevated for hours afterward before going back down to baseline, without ever going below baseline.”

This is why Dr Lembke starts her day by avoiding her phone and doing the hard things first. She said on a recent podcast interview:
“I won’t even go on my laptop until I’ve exercised, eaten breakfast, I’ve read a paper that gets delivered to my house, I’ve made my bed . . . I’ve done all the things I need to do to centre myself for the day.”
Similarly, I equate my movement practice with getting my brain ready for the day and accessing parts of myself that would otherwise lie dormant.
Sometimes movement helps me to experience a wonderful flow state. I feel in tune with my mind and body. Things just feel easier.
But even if I don’t reach a state of flow, moving helps me be more present and show up as the best version of myself in the other areas of my life, such as my work and when I’m with my family.
My movement practice is something I’ve come to genuinely enjoy. It’s not something I need to rush through to tick off a list.
If you’re reading this and thinking “But I don’t like movement” and “I’m not an athletic person”, I get it because I wasn’t always a super active person.
There was a time when movement felt like a grind. I felt clumsy and awkward. It was something I just had to get done.
So, what led to this dramatic shift in how I related to movement?
I shifted from training for my appearance (to stay lean) to training to feel good.
Psychologists would say I became intrinsically motivated to move rather than extrinsically motivated.
When you’re extrinsically motivated, you’re moving to lose weight, achieve a particular look (e.g., the fitness influencer look), or have a sexy body. You’re trying to reach some place in the future, and it often takes you to a place of misery.
In my early twenties, I became friends with a businesswoman who was also a female bodybuilder. I was inspired by her discipline and focus, so when she invited me to attend a Bodybuilding competition, I jumped at the chance. I thought, “Why not?”
I should point out that this was in the pre-social-media era, when you couldn’t easily watch videos of people flexing their muscles online. You had to go to competitions like these, or watch a documentary (rented from a video store), to get a glimpse into the world of bodybuilding.
As we sat in the audience at the Bodybuilding Championships, one perfectly chiselled body after another walked onto the stage and flexed their muscles. I felt inspired.

Without knowing what went into getting visible abs and perfectly toned bodies like these, I remember thinking, “I want a body like that!”
A couple of hours later, the judges announced the bodybuilding champions, and shortly after, the party kicked off as everyone hit the dance floor, including the bodybuilders I had watched strut their stuff across the stage.
At one point, I found myself dancing next to the Female Bodybuilding Champion. She was holding her massive trophy, and I couldn’t help but notice that her face had a pained expression and she was struggling to move and stay upright.
She’d just been crowned Bodybuilding Champion of the Year, so I thought, “Why is she looking so sad and weak?”
I spun around, told her she looked amazing, and congratulated her. I then asked her (shouting over the loud music) how she was feeling. Her answer took me by surprise. She said:
“I’m so tired and hungry. I just want to go home and eat a pizza!”
That’s when I realised she had been starving herself for the competition, and just like that, the idea of achieving a body like hers quickly vanished from my mind.
To achieve the ‘perfect’ look, bodybuilders and fitness influencers often severely restrict their diets, which can be harmful.
In the book How Not to Die (Too Soon), Professor and Personal Trainer Devi Sridhar states:
“For most women, achieving visible abs requires an extremely low body fat percentage (less than 17 per cent, below the 20-23 per cent healthy range), which is often linked to irregular menstruation, brittle nails, feeling faint and disrupted hormone production.”

So, unless you want to feel faint and constantly crave pizza, think twice before setting a goal to look like a bodybuilding champion or a fitness influencer!
When the focus is on aesthetics, you undermine the joy of movement.
In the DW documentary Muscles – More than Power and Pumping Iron, social media influencer and former Bikini model champion Sophia Thiel shared her experience of training to achieve the ‘perfect’ body. She states:
“When you train for the sake of your appearance, it can quickly tear you apart and take away all the joy that the sport normally brings with it.”
Post competition, Sophia found it difficult to maintain her competitive form and stick to her competition diet. Her weight began to fluctuate, and the nasty online comments about her appearance started to take their toll on her mental health.
At some point, Sophia shifted her focus from her appearance to how lifting weights made her feel. She said:
“Today my motivation for working out is very different. It brings a lot more balance to my life. I can deal with stress better. The way I carry myself is completely different, which gives me self-confidence. My sleep and concentration are better too. In other words, training improves my quality of life.”

Making the mental shift, like Sophia did, from wanting to look good to feeling good, is a total game-changer.
But in our image-obsessed world, it’s easy to lose sight of the mind and mood-altering effects of physical movement (spending less time on social media and unfollowing fitness influencers can help with this mental shift).
Harvard Professor John Ratey sums it up nicely when he says physical exercise is like “a little bit of Prozac and a little bit of Ritalin”. It does wonders for your brain (especially your attention and mood) with no nasty side effects.
To sum up
Instead of reaching for your phone first thing in the morning, try reaching for your running shoes, a set of dumbbells, or a yoga mat.
Developing a morning movement practice is one of the simplest and most powerful things you can do to benefit your brain and improve the quality of your life.
But the key is to find delight in moving for the sake of moving. You need to persist with the movement for long enough – at least 20 minutes – for your brain to reward you with a dose of feel good chemicals.
When movement becomes inherently enjoyable, you’ll find yourself doing it more often. Before you know it, it will be a non-negotiable part of your day. In the words of Dr Kelly McGonigal, “regular exposure to exercise will over time teach your brain to like, want, and need it”.
Image 6: “2013 Fall Classic Natural Bodybuilding Competition – U.S. Army Garrison Humphreys, South Korea – 28 Sep 2013” by USAG-Humphreys is licensed under CC BY 2.0.

But I’ve also had to learn to move to learn.
Does that makes sense? If not, let me explain myself.
Like most students, I was conditioned to sit still in a chair for hours each day. Even though I felt chained to my chair in school, there was one part of my body that I could move: my arms and hands.
I could gesture to express ideas.
Being half Italian, using my hands to gesticulate feels completely natural and normal. Growing up, I watched my Italian relatives gesture dramatically to stress a point and communicate ideas.
Having been exposed to this from a young age, I didn’t know how to behave any differently. It’s just what you did when you spoke: you used your hands.
However, my bold hand gestures weren’t always welcome, and they inevitably drew attention in the classroom.
People would comment, “Ha! Look at the way she uses her hands!” and “You’re so Italian!”.
My hand gestures were too over-the-top. I needed to tone things down.
When I was in Year 9, I tried to restrain my hand gestures. I alternated between sitting on my hands, folding them and cupping them in my lap.
I didn’t realise it at the time, but by suppressing my hands’ natural urge to move, I was doing my brain a disservice.
This study by Langhanns and Müller found that when students were asked to sit still while solving problems, their cognitive load increased and their overall success in solving problems decreased.

In other words, when you focus on being still and try to ignore your body’s natural urge to move, this consumes a lot of your brainpower.
Fortunately, I gave up trying to suppress my hand gestures. There was no point in trying. My hand gestures were like a wild horse. They would always break free.

All these years later, I can see that my ability to gesture naturally and effortlessly made me good at public speaking. While other robotic speakers had to be coached into adding a few hand gestures, I moved my hands with ease.
But that’s not all; by using my hands in class, I was also tapping into special learning superpowers.
Research shows physical movement, including the use of gestures, helps improve understanding and boosts memory.
I’m referring to an experimental study conducted by a husband and wife research team, Tony and Helga Noice. This couple spent many years studying actors and their ability to learn and recall lines.

Their research found that actors were able to accurately recall lines that had been accompanied by movements months after the final stage performance. However, these same actors struggled to remember lines that had been spoken when they remained in one place.
The Noices wanted to know if ordinary people (non-actors) could benefit from engaging in physical movement and using gestures when learning and retrieving dialogue.

They devised an experiment involving 23 university students. They split these students into three groups:
Group 1: Movement condition
Group 2: Verbal communication only condition
Group 3: Memorisation condition (Control)
In the movement condition, students were taught how to move in the scene (without reading their scripts). They were then given scripts and read their lines while moving their bodies.
In the verbal communication condition, these students sat on chairs and were told to read their lines out loud. They weren’t allowed to move.
Groups 1 and 2 were told not to memorise the dialogue but instead to focus on the meaning of what they were saying. They were instructed to adopt an actor’s approach to learning (i.e., to be fully present and mean what they were saying as they said it).
In contrast, Group 3 (the control group) was instructed to try to memorise their lines using whatever strategy they’d found successful in the past.
Students in each group were given only five minutes to learn their lines. They were then given a brief distractor task (“Write down five movies you saw recently”) before being tested on their ability to recall their lines.
The researchers found that the students in the movement condition remembered 76% of their lines compared with only 37% for the memorisation control group.

The researchers concluded:
“Students who actively experienced communicating the meaning of the material by using both words and movements recalled significantly more material than did either students who communicated using only words or students who deliberately memorized the same text.”
It’s important to note that the students in the movement condition weren’t just waving their arms around in the air. Their movements had meaning and were connected to what they were saying.
There are several ways you can utilise your body to learn.
If you’re trying to learn a new concept or memorise a presentation, don’t be afraid to use your hands and body. Think about what you’re saying. Can you apply a gesture or move your body to help you memorise an idea and improve your understanding?
As the authors of The Extended Mind In Action state:
“…the feel of our hands making a gesture reinforces our memory.”
This is why I also practice my presentations on my feet, using my hands and all my body to express ideas.
If you’re an online educator or teacher, it’s really important that students can see your arms and hands. Research shows that instructional videos that include people gesturing result in significantly more learning for people who watch them.
When I first started delivering online presentations, I made the mistake of only showing my head and shoulders.

After exploring the research in this area, I quickly adjusted my studio setup so that students could see my hands and arms as well. This small tweak made a huge difference in improving student learning.

I also encourage students to gesture back to check their understanding and reinforce key ideas. If you’re a teacher, I encourage you to try doing this with your students, too.
Besides using specific gestures and movements to learn concepts and dialogue, it’s also worth considering the benefits of engaging in light to moderate-intensity exercise before sitting down to study.
A fabulous research study called Sweat So You Don’t Forget found that when students engaged in five-minute exercise breaks every 17 minutes, they could focus better and remembered more than students who didn’t get any breaks or had a sedentary break (playing video games).
Annie Murphy Paul writes in her book The Extended Mind: The Power of Thinking Outside the Brain:
“…we have it within our power to induce in ourselves a state that is ideal for learning, creating, and engaging in other kinds of complex cognition: by exercising briskly just before we do so.”

This is why, every morning, before I start my work, I run on my treadmill or ride my stationary bike for at least 20 minutes. This gives me a cognitive boost: it improves my focus, creativity, executive function and ability to learn.
The movement also helps to decrease anxiety by supplying my brain with a dose of BDNF (i.e. brain-derived neutrophic factor). Dr Jennifer Heisz, in her book Move the Body, Heal the Mind, explains that BDNF is like fertiliser for the brain. She writes:
“BDNF acts like a fertilizer that promotes the growth, function, and survival of brain cells, including those that turn off the stress response.”
She continues:
“Immediately after exercising, our brain cells are bathed in BDNF, which protects those cells against the toxic effects of high stress.”
As I think back to high stress times in my life, I have no doubt that movement (and regular doses of BDNF) are what got me through these periods.
Your body is a powerful tool to help you learn. The research is clear that moving your body enhances your ability to think and learn.
It’s time to move past the outdated idea that learning means sitting still and being serious. It costs us nothing to gesture with our hands while reading about a concept or to go for a walk outside before studying.
Movement benefits us in many ways, so why not include some in your study routine today?
Research shows active recall (aka retrieval practice) is a highly effective strategy for remembering information. This strategy will take your studies and your grades to the next level.
Active recall involves bringing information to mind without looking at your books and notes.
I have spent the last 30 days experimenting with this excellent learning strategy. In this blog, I’ll share what I did and how I kept the process interesting for my brain.
I no longer need to study for tests and exams.
So, why did I spend 30 days using active recall strategies?
In my line of work, I need to constantly come up with new and original content to present to students. I also need to memorise this content. Why?
Because if I was to read from a sheet of notes or text heavy slides that would be really boring for students. I want to connect with students and to do this, I have to be able to deliver the content off the top of my head with speed and ease.
This is where active recall enters the picture.
Active recall helps to speed up the learning process. It allows you to learn more in less time.
Below I share some of the ways I use active recall to learn new presentation content. Keep in mind, you can use all of these strategies to prepare for an upcoming test or exam.
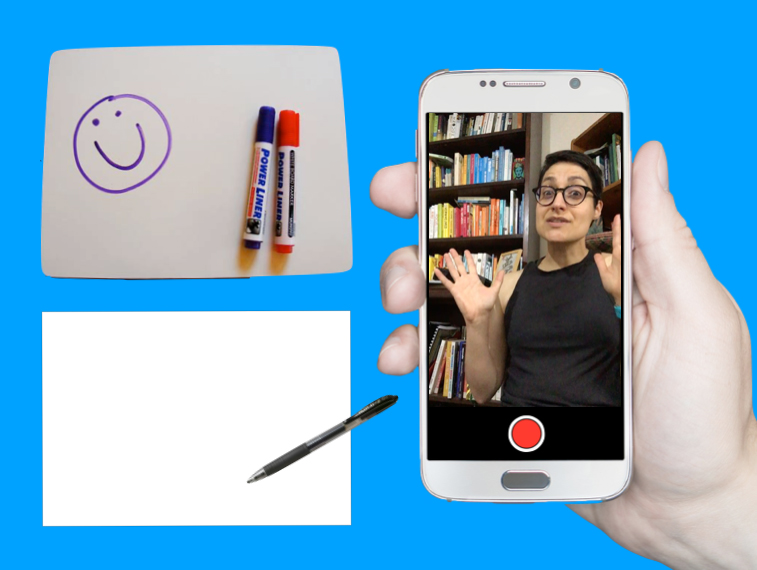
Whiteboards are wonderful learning tools. Here’s how I use a whiteboard to do active recall . . .
I push my speech notes to the side, so I can’t look at them. Then I grab a marker and say to myself, “What can you remember? Go!”.
I write out everything I can remember on the whiteboard. Once I’ve exhausted my memory, I pick up my notes and check to see how I went (using a red marker to make corrections).
No whiteboard? No problem!
I pick up a pen and sheet of paper and start scribbling out whatever I can remember on the topic. When I get stuck, I pause and take a few deep breaths as I try to scan my brain for the information.
I regularly remind myself that it is okay to not remember the content. “This is how the process goes!”, I say to myself. There is no point beating myself up. That only leads to feelings of misery and not wanting to do active recall practice.
After having a shot at it, I take out my notes, pick up a red pen, and begin the process of checking to see how I went.
Sick of writing? I get it.
Try drawing out the information instead. Alternatively, you can use a combination of words and pictures, which is what I often do.
Grab a blank piece of paper (A3 size is best) and create a mind map of everything you can remember on a topic (no peeking at your notes). Then check your notes or the original mind map to see what you remembered correctly and incorrectly.
Writing and drawing out information can take time. If you want to speed up the process, you can talk to yourself.

But don’t do this in your head. It’s too easy to just say “Yeah, yeah, I know this stuff!”. You need to speak it out loud as this forces you to have a complete thought. Then, check your notes to see how you went.
The only downside with this approach is you don’t have a tangible record of what you recalled, which brings me to the next strategy . . .
I make videos of myself presenting the content (without referring to my notes). Although I use special software and tools to make my videos, you don’t need any fancy equipment. Your phone will do the job. Here’s what you can do . . .
Set your phone up so the camera is facing you. Now hit the record button and tell the camera what you’re going to do active recall on. Have a shot at explaining the idea. Then stop recording and hit the play button.

Watching yourself struggle to remember information is often hard viewing. But this is where it’s super important to double down on telling yourself kind thoughts (e.g., “I’m still learning this content. It’s going to be rusty and feel clunky – that’s okay!”).
You need to take a deep breath and keep watching because the video will give you valuable feedback.
For example, if you stop midsentence and you don’t know how to proceed, that tells you something: you don’t know this stuff so well! Make a note. This part of the content needs your attention.
Hand your notes over to a friend, parent, or sibling. Now get them to ask you questions on the content.
I sat with my mum and showed her a print out of my slides for a new presentation. The slides were just pictures (no text).
As I went through the slides, I explained the ideas to mum. I made notes of any sections I was rusty on. Mum also asked lots of questions, which allowed me to think more deeply about the content.
When it came crunch time (a few days before the final presentation), I printed out my presentation slides (16 per page) and used each slide as a prompt. I’d look at the slide and say, “What do I need to say here?”.

Sometimes I wrote out what I’d be saying in relation to each slide (without looking at my notes). Then I checked my original notes to make sure I hadn’t forgotten anything.
It’s really important that you don’t skip the stage of checking to see how you went, especially as you become more confident with the content.
At times, I found myself thinking “I know this stuff! I don’t need to check my notes” but then another part would say, “You better just check . . . just to be on the safe side”.
I’m glad I forced myself to check because more often than not I would discover that I had missed a crucial point.
Zines are cute little booklets you can create on any topic you like. They are fun to make, so I thought I’d try making a mini zine on the main points of some new content I had to learn.
I folded up an A4 page into a booklet and then I sketched out the main points on each panel.
I create a deck of flashcards on some key ideas (question on one side and the answer on the back) and then I test myself with them.
I read the question and before flipping the card, I write out the answer on a sheet of paper or say it out loud. Then I check to see how I went.
The beauty of flashcards is they are small and portable (they can easily fit in your pocket or bag). Whenever you have a spare minute or two, you can get a little active recall practice in.
It’s not enough to do active recall just once on the content you need to learn. For best results, you want to practice recalling the information several times over a period of time.
I didn’t follow a strict schedule for the 30 days. I had my notes for each important chunk of information I had to learn pinned to eight different clipboards.
Every morning, I’d pick up a different clipboard and I’d practice that specific content. I knew as long as I’d had a good night’s sleep in between practice sessions that the information was being strengthened in my brain.
Doing active recall is a bit like doing a high intensity workout: it can be exhausting. But you must remember, just like a high intensity exercise session is an effective way to train and get fit, active recall is an effective way to learn. Unlike less effective strategies (e.g., rereading and highlighting), you can learn a lot in a short space of time with active recall.
The key is to expect the process to be a little uncomfortable. Don’t fight the discomfort. If you trust the process and persevere, it won’t be long before you begin to see amazing results.
Just because active recall is challenging to do that doesn’t mean you can’t have fun with it.
Using a combination of different active recall strategies is one way to keep things fresh and interesting for your brain. But you may wish to try the following things to add a little boost of fun to your active recall sessions:
• Use a different type of pen
• Use a different coloured pen
• Change the type of paper or notebook you use (e.g., instead of using lined paper, use blank A3 paper)
• Incorporate movement into your active recall sessions (e.g., walk and test yourself with some flashcards)
• Change your study environment (e.g., go to the library or study outside)

Like I said, active recall is challenging to do, especially when you first start learning new content. You can feel awkward and clumsy. For this reason, it’s easy to make excuses to get out of doing it (e.g., “I’m too tired”, “I’m not ready to do it”, and “It’s not the right time”).
This is where you need to harness the power of habits.
Find a set time in your day to do a little active recall practice. For instance, during my 30 days of active recall, I scheduled my practice sessions for first thing in the morning. I knew after I washed my face, I would sit down to practice.
Incorporating active recall into my morning routine worked really well for me. I was getting the hardest thing done first thing in the day. And once it was done, I could relax. It was done and dusted!
At a certain point, I became more confident with the content and I found I was on a roll. I felt motivated to do active recall.
This is when I started to look for spare moments in the day to squeeze in a few extra mini practice sessions.
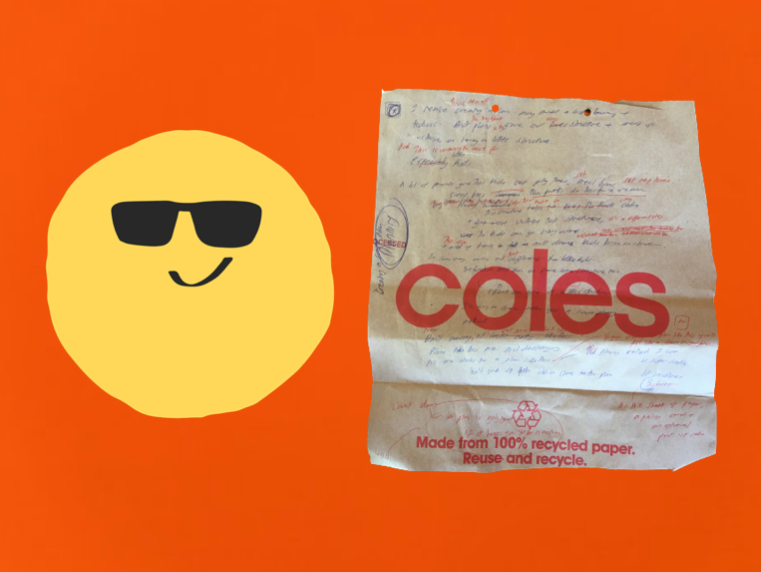
For example, one day I found myself waiting in a car. I grabbed a paper shopping bag and started scribbling out the content onto the bag. As soon as I got home, I checked the shopping bag against my notes.
I hope you can see that there’s no one set way to do active recall. This is a highly effective strategy you can be creative with. As long as you’re testing yourself and checking to see how you went, you can’t go wrong.
And if you do make a mistake? It’s no big deal. If you check to see how you went, you won’t embed the error in your long-term memory.